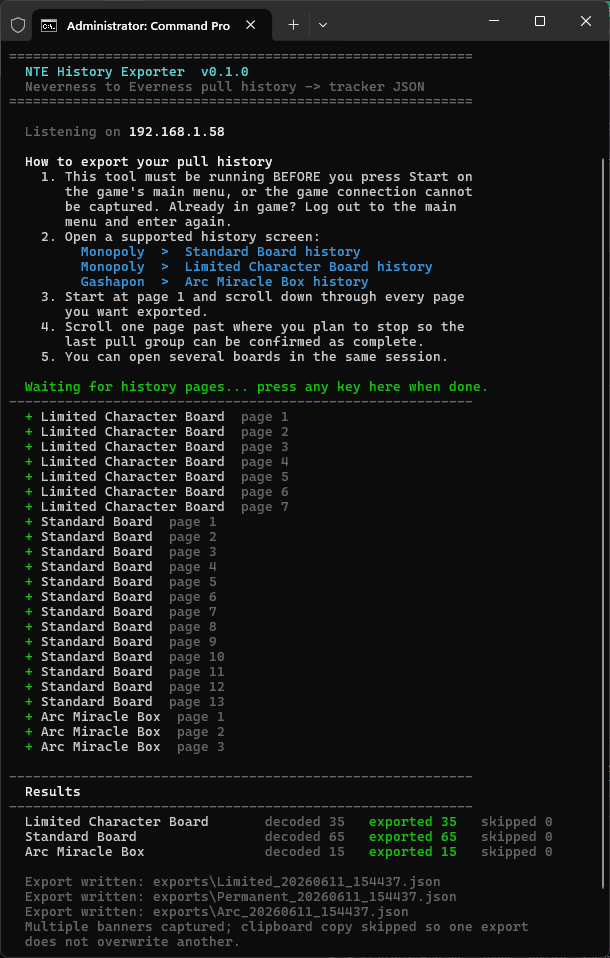
# NTE History Exporter
Prototype CLI exporter for **Neverness to Everness** pull history — decodes your own game traffic into sanitized JSON ready for tracker import.



## Supported Banners
| System | Banner | Banner ID | Pity pool |
| -------- | ----------------------- | -------------------------- | ---------- |
| Monopoly | Standard Board | `Lottery_Permanent` | Per-banner |
| Monopoly | Limited Character Board | `Lottery_LimitedCharacter` | Shared |
| Gashapon | Arc Miracle Box | `Arc_MiracleBox` | Shared |
## What It Does
The exporter decodes Permanent Board, Limited Character Board, and Arc Miracle Box history pages from captured UDP data, applies conservative timestamp-boundary handling, and writes sanitized JSON suitable for tracker import.
> [!NOTE]
> The import JSON contains decoded history rows and the shareable NTE user UID when it can be detected. It does **not** export tokens, account IDs, role IDs, device IDs, server IPs, raw packets, cookies, session data, or other capture metadata.
## Requirements
- Python 3.10 or newer when running from source. Release binaries include the Python runtime.
- Packet-capture permission. On Windows, Npcap can usually capture without running this tool as Administrator; the raw-socket fallback may need Administrator. On Linux and macOS, use root or capture capabilities as required by your system.
- **Windows:** [Npcap](https://npcap.com/) is recommended. Install it normally; WinPcap API-compatible mode is not required. If Npcap is unavailable or cannot be initialized, `auto` falls back to the Windows built-in raw-socket backend.
- **Linux:** install the system **libpcap** runtime if it is not already present. Package names commonly include `libpcap0.8` on Debian/Ubuntu and `libpcap` on Fedora, Arch, and similar distributions.
- **macOS:** the system normally includes **libpcap**, so no separate Npcap installation is needed.
Npcap is Windows-only and is not bundled with this project. Linux and macOS use libpcap, the cross-platform capture library on which Npcap is based.
## Downloads
Compiled command-line builds are published from GitHub Actions as release assets:
- `nte-history-exporter.exe` for Windows
- `nte-history-exporter-linux` for Linux
- `nte-history-exporter-macos` for macOS
- Versioned `.zip` archives for each platform
The Windows executable is a single console app. Start it from a terminal:
```powershell
.\nte-history-exporter.exe
```
On Linux and macOS, make the downloaded binary executable before running it. Use `sudo` only when your system requires elevated capture permission:
```bash
chmod +x ./nte-history-exporter-linux
sudo ./nte-history-exporter-linux
```
Use `nte-history-exporter-macos` in the same way on macOS. If your browser or OS blocks a downloaded macOS binary, allow it from the system security prompt before running it again.
## Usage
### Live capture
The default `auto` capture backend uses:
- **Windows:** Npcap when installed, with automatic fallback to the built-in Windows raw-socket backend.
- **Linux/macOS:** the system libpcap library.
Use `--capture-backend libpcap` to require Npcap/libpcap without fallback, or `--capture-backend raw` to require the Windows raw-socket backend.
#### Windows
Downloaded executable:
```powershell
.\nte-history-exporter.exe
```
From source:
```powershell
.\run-exporter.ps1
```
Or simply double-click **`run-exporter.cmd`**.
> [!IMPORTANT]
> For automatic user UID detection, launch the tool **before pressing Start on the game's main menu**. If you are already in game, history capture can still work; the tool will ask for your UID before saving if it cannot detect it automatically.
Once running, open any supported history board in game. The tool keeps listening until you press any key. Exports are written under `exports\` as:
- `